Support our educational content for free when you purchase through links on our site. Learn more
🚀 How to Set Up & Calibrate Your FPV Drone for Optimal Performance (2026)
Ever felt the heart-stopping moment when your drone, instead of executing a perfect roll, suddenly decides to do a “death spiral” into a tree? We’ve all been there. It usually isn’t bad luck; it’s a missing step in the calibration dance. Setting up an FPV drone isn’t just about plugging in wires; it’s a delicate symphony of mechanical precision and software finese. While some forums might ask if you need to calibrate a specific Flywing model before every flight, the real secret lies in understanding why and when your sensors need a reset to keep your flight smooth as butter.
In this comprehensive guide, the team at Drone Brands™ walks you through the entire journey—from unboxing your new beast to dialing in those perfect PID gains and rates. We’ll reveal why your “floaty” feeling isn’t a software bug, but a mechanical symptom, and how a simple gyro calibration on a level surface can save your next session. Whether you are a racing rookie or a frestyle veteran, mastering these steps is the difference between a crash and a clip-worthy landing.
Key Takeaways
- Mechanical Integrity is Non-Negotiable: No amount of software calibration can fix a bent motor shaft or loose propeller; always inspect your hardware first.
- Calibrate on a Level Surface: A gyro calibration performed on an uneven surface is the #1 cause of unexplained drift and flight instability.
- Rates Define the Feel, PIDs Define the Stability: Don’t obsess over complex PID tuning until you have dialed in your RC Rates and Expo for your specific flying style.
- Safety First: Always remove propellers before connecting to Betaflight or performing any calibration routines to prevent accidental motor spins.
- Use Blackbox Logging: If your drone still feels “off” after calibration, enable Blackbox to visualize exactly where the error lies.
Table of Contents
- ⚡️ Quick Tips and Facts
- 🕰️ A Brief History of FPV Calibration: From Analog Glitches to Digital Precision
- 🛠️ Essential Tools and Gear for Your FPV Setup Journey
- 📦 Unboxing and Pre-Flight Inspection: What to Check Before Powering Up
- 📡 Step-by-Step Guide: How to Set Up Your FPV Drone for Optimal Performance
- 🎯 Mastering the Art of Calibration: Gyro, Accelerometer, and Compass
- 🎚️ PID Tuning and Rate Configuration: Dialing in the Perfect Feel
- 📹 Video System Setup: Optimizing Analog and Digital FPV Feds
- 🔋 Battery Management and Power Distribution: Keeping the Juice Flowing
- 🚀 First Flight Checklist: From Hangar to Sky in Minutes
- 🛑 Troubleshooting Common FPV Setup and Calibration Issues
- 💡 Pro Tips: Advanced Techniques for Race and Frestyle Pilots
- 🏁 Conclusion
- 🔗 Recommended Links
- ❓ FAQ
- 📚 Reference Links
⚡️ Quick Tips and Facts
Before we dive into the deep end of the pool, let’s splash around with some golden nugets that could save your drone (and your wallet) from a catastrophic crash.
- Calibration is King, but Vibration is the Queen: You can calibrate your gyro a thousand times, but if your motors are vibrating like a washing machine on the spin cycle, your drone will still fly like a drunken sailor. Mechanical integrity comes before software tweaks.
- The “Black Box” Myth: Many beginners think they need to be a coding wizard to tune a drone. While CLI (Command Line Interface) is powerful, 90% of optimal performance comes from understanding the GUI (Graphical User Interface) in Betaflight and getting your rates right.
- Propeller Direction Matters: Installing a propeller backward isn’t just inefficient; it’s a recipe for a “prop strike” that can shred your motors. Always double-check the CW (Clockwise) and CCW (Counter-Clockwise) markings.
- The 10% Rule: If your drone feels “floaty” or “twitchy,” don’t immediately blame the PID gains. Check your RC Rate and Expo settings first. As we’ll see later, rates dictate the feel, while PIDs dictate the stability.
For a deeper dive into the world of these agile machines, check out our comprehensive guide on FPV drones to understand the ecosystem before you even plug in your USB cable.
🕰️ A Brief History of FPV Calibration: From Analog Glitches to Digital Precision

Remember the days when “calibrating” meant holding your drone still and hoping the gyroscope didn’t drift enough to make you crash into a tree? It wasn’t always this sophisticated.
In the early days of FPV (First Person View), pilots relied on analog video signals and basic flight controllers like the KK2.1.5. These boards were the “Hello World” of drone flying. As noted by veteran pilots, the KK2.1.5 was decent for “Self Level” (Horizon) mode, but in “Rate Mode,” it often wobbled in the wind, lacking the “locked-in” feel we crave today.
Then came the Naze32 and the rise of MultiWii and Cleanflight. Suddenly, we had Bluetooth connectivity to tweak settings on the fly! As one pioneer put it: “In rate mode it is very locked-in even when descents, or in high wind… I like working with the multiwii, which allows me to connect the FC to my phone through Bluetooth, so I can change the settings (PID and so on) a lot easier.”
Today, we stand on the shoulders of giants with Betaflight, iNav, and EmuFlight. We have Blackbox logging to visualize exactly what the drone is doing millisecond by millisecond. We have DShot protocols that eliminate analog signal noise between the flight controller and ESCs. But despite this tech evolution, the fundamental question remains: How do we make this machine dance to our will?
The journey from a wobbly, glitchy mess to a buttery-smooth frestyle beast is a story of calibration, tuning, and patience. And that’s exactly where we are going next.
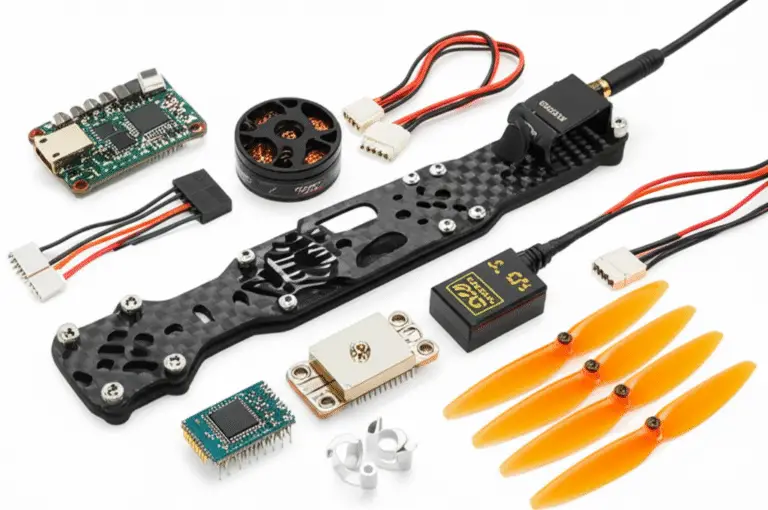
🛠️ Essential Tools and Gear for Your FPV Setup Journey
You wouldn’t try to fix a car engine with a butter knife, and you shouldn’t try to set up an FPV drone with just a screwdriver. Here is the Drone Brands™ toolkit for success:
| Tool Category | Essential Item | Why You Need It |
|---|---|---|
| Soldering | TS10 or Pinecil Soldering Iron | Precision heat control for delicate flight controller pads. |
| Soldering | Lead-Free Solder (0.5mm or 0.8mm) | Reliable connections that won’t crack under vibration. |
| Software | Betaflight Configurator | The brain of your operation. Available on Windows, Mac, Linux. |
| Hardware | USB-C to USB-A Cable | High-quality data transfer (don’t use a charging-only cable!). |
| Safety | Propeller Guard (for bench testing) | Prevents accidental prop strikes while you arm the motors. |
| Measurement | Digital Multimeter | Checking continuity, voltage, and short circuits. |
| Power | LiPo Battery Charger (e.g., ISDT, SkyRC) | Safe charging is non-negotiable. |
| Goggles | DJI Goggles 2 or FatShark | To see what your drone sees. |
Pro Tip: Always have a USB hub handy. You’ll often need to power your radio, your goggles, and your laptop simultaneously.
📦 Unboxing and Pre-Flight Inspection: What to Check Before Powering Up
So, you’ve got your new DJI Avata, a GEPRC Mark5, or a custom-built iFlight Nazgul in your hands. The excitement is palpable! But before you plug that USB cable in, let’s play detective.
The Visual Inspection
- Check for Shipping Damage: Look for cracked carbon fiber, loose screws, or bent motor shafts. A bent shaft will cause vibration that no amount of calibration can fix.
- Solder Joint Check: If it’s a DIY build, inspect every solder joint. Cold joints (dull, grainy look) are the enemy. They should be shiny and smooth.
- Propeller Fit: Ensure props sit flush against the motor bell. If they wobble, your gyro will go crazy trying to compensate.
The “Smell Test”
Power up the drone (without props!) and give it a sniff. Do you smell burning electronics? If so, STOP. Check for shorts.
The “Spin Test”
With props OFF, arm the drone and gently move the throttle. Do all four motors spin smoothly? Do they stop immediately when you disarm? If one motor drags or makes a grinding noise, you have a mechanical issue.
Wait, why do we remove props before calibration?
You might be wondering why we obsess over removing props during setup. It’s simple: Safety. If a motor spins unexpectedly during a calibration routine, it can shred your fingers or damage the drone. We’ll cover the specific safety protocols in the next section.
📡 Step-by-Step Guide: How to Set Up Your FPV Drone for Optimal Performance
Now, the real magic begins. We are going to take your drone from a box of parts to a flying machine.
1. Configuring Betaflight: The Brain of Your Beast
First, connect your drone to your computer via USB. Open Betaflight Configurator.
- Firmware Version: Ensure you are running the latest stable version of Betaflight.
- Board Orientation: This is critical! If your drone is mounted sideways, your controls will be reversed. Use the Board Orientation tab to align the drone’s “nose” with the arrow in the software.
- Ports Tab: Enable Serial RX on the UART port where your receiver is connected (usually UART 2 or 3).
2. Motor Direction and Propeller Orientation: Getting the Spin Right
This is where many new pilots get stuck.
- The Rule: Front-Left and Back-Right motors spin Clockwise (CW). Front-Right and Back-Left spin Counter-Clockwise (CCW).
- The Fix: If a motor spins the wrong way, you can swap two of the three motor wires in the Motors tab, or change the direction in the Motor Direction settings (if using DShot).
3. Receiver Binding: Linking Your Remote to the Drone
- CRSF (Crossfire), SBUS, or ELRS? Most modern drones use ELRS (ExpressLRS) or CRSF.
- Binding Process: Put your receiver in binding mode (usually by holding a button or toggling a switch), then bind your radio.
- Verification: In the Receiver tab, move your sticks. The bars should move in real-time. If they don’t, check your Serial RX settings.
4. Arming and Disarming: Safety First, Flying Second
- Arming Switch: Assign a switch on your radio to “Arm.”
- Bepers: Enable the Beeper feature. It will chirp when you arm and disarm, giving you audio feedback.
- Safety Check: Always ensure your throttle stick is at the bottom before arming.
🎯 Mastering the Art of Calibration: Gyro, Accelerometer, and Compass
You’ve got the basics down. Now, let’s make it smooth.
1. Gyroscope Calibration: Eliminating the Drift
The gyroscope tells the drone how it’s moving. If it’s not calibrated, your drone will drift even when you let go of the sticks.
- How to Calibrate: Place the drone on a perfectly level surface. Go to the Calibration tab in Betaflight. Click Calibrate Gyro.
- The “Still” Factor: Do not touch the drone during this process. Even a vibration from your finger can ruin the calibration.
2. Accelerometer Calibration: Leveling the Playing Field
The accelerometer helps the drone know which way is “up.” This is crucial for Angle Mode (self-leveling).
- The Process: In the Calibration tab, click Calibrate Accelerometer. You will need to tilt the drone to specific angles (flat, 45 degrees, etc.) as prompted.
- Why it matters: Without this, your “Level” mode will be wonky, and the drone will struggle to return to a flat hover.
3. Compass Calibration: Navigating the Magnetic Field
Note: Most pure FPV racing/frestyle drones do not have a compass (magnetometer) because they fly in Acro Mode (no self-leveling). However, if you are doing long-range or GPS-assisted flights, this is vital.
- The Process: If you have a compass, use the Calibrate Magnetometer feature. You will need to rotate the drone in all directions (like a 3D figure-8) to map the magnetic field.
- Interference Warning: Keep the drone away from large metal objects, concrete, and your own phone during this process.
🎚️ PID Tuning and Rate Configuration: Dialing in the Perfect Feel
Here is the secret sauce. Many beginners obsess over PID tuning (Proportional, Integral, Derivative), but as the “First Video” perspective suggests, Rates are actually the most important factor in how a drone fels.
Understanding Rates
- RC Rate: How fast the drone moves from center to max deflection.
- Expo (Exponential): Softens the response near the center of the stick, making small movements smoother.
- Super Expo: Adds even more softness near the center.
Frestyle vs. Racing:
- Frestyle: You want a higher center sensitivity (more control for small movements) and some Expo to make flips and rolls smoother.
- Racing: You want high max rates and less Expo for instant, snappy turns.
PID Tuning Basics
If your drone oscillates (shakes) at high throttle, your P (Proportional) gain is too high. If it feels sluggish or “floaty,” your I (Integral) gain might be too low.
- The TPA (Throttle PID Attenuation): This reduces P gain as you increase throttle. If your drone is stable at low throttle but shakes at full throttle, increase your TPA.
Wait, what about the “loptime” mentioned in older guides?
You might have read about settingloptimeto 250 or 160 in the CLI. While this was crucial for the old Naze32 boards, modern flight controllers (like the F72 or H743) handle looptime automatically. Don’t mess with CLI unless you know exactly what you are doing!
📹 Video System Setup: Optimizing Analog and Digital FPV Feds
Your drone is flying, but can you see?
Analog Systems (DJI, Walksnail, HDZero)
- Frequency Selection: Use a frequency that doesn’t overlap with your neighbors. Apps like FPV Frequency can help.
- VTX Power: Start low (25mW) for testing. Increase to 20mW or 80mW only if you need range. High power = more heat = shorter component life.
Digital Systems (DJI O3, Walksnail Avatar)
- Antenna Placement: Ensure your goggles and drone antennas are not blocked. Metal frames can block signals.
- Latency: Digital systems have higher latency than analog. Adjust your gimbal settings to compensate for the slight delay.
🔋 Battery Management and Power Distribution: Keeping the Juice Flowing
A drone is only as good as its power source.
- LiPo Safety: Never charge a LiPo battery unattended. Use a LiPo-safe bag.
- Cell Balance: Ensure all cells are balanced. A 4S battery should read ~16.8V fully charged. If one cell is at 4.0V and another at 3.5V, you have a problem.
- Power Distribution: Check your XT60 or XT30 connectors. Loose connections cause voltage drops, which can reset your flight controller mid-flight.
🚀 First Flight Checklist: From Hangar to Sky in Minutes
You’ve done the work. Now, let’s fly.
- Props On: Double-check CW/CCW orientation.
- Battery On: Connect the LiPo. Listen for the beep.
- Goggles On: Ensure you have a clear video feed.
- Radio On: Check stick movement.
- Arming: Move the arm switch. Listen for the “Bep-Bep” confirmation.
- Throttle Check: Gently move the throttle. Do the motors spin?
- Takeoff: Gently lift off. Hover for 5 seconds. Does it drift? If yes, land immediately and re-calibrate.
- The Test: Try a small roll. Does it feel right?
🛑 Troubleshooting Common FPV Setup and Calibration Issues
Even the best pilots crash. Here’s how to fix the common gremlins.
| Issue | Possible Cause | Solution |
|---|---|---|
| Drone Drifts | Gyro not calibrated | Re-calibrate on a level surface. |
| Oscillation at High Throttle | P gain too high / TPA too low | Lower P gain or increase TPA. |
| Motor Won’t Spin | ESC not calibrated / Motor direction wrong | Re-calibrate ESCs (if needed) or swap wires. |
| Video Static | VTX power too high / Antenna loose | Lower power or check antenna connection. |
| Receiver Lost Signal | Radio range / Interference | Check frequency, move closer, or upgrade antenna. |
💡 Pro Tips: Advanced Techniques for Race and Frestyle Pilots
Ready to take it to the next level?
- Blackbox Logging: Enable Blackbox in Betaflight. This records flight data to your SD card. You can analyze this later to see exactly why your drone shook.
- PID Profiles: Set up different PID profiles for different batteries (e.g., 4S vs 6S) or different flying styles (Race vs. Frestyle). Switch between them with a radio switch.
- Filter Tuning: Use the Dynamic Notch Filter to reduce noise without sacrificing responsiveness. This is a game-changer for smoothness.
- Expo Experimentation: Don’t be afraid to tweak your Expo. A small change from 0.15 to 0.20 can make a huge difference in how “snappy” your flips feel.
But what if I still can’t get it right?
Sometimes, no amount of software tuning can fix a mechanical issue. If your drone still feels off, check your motor mounts and frame rigidity. A loose screw can ruin the best PID tune in the world.
🏁 Conclusion

Setting up and calibrating your FPV drone is a journey of trial, error, and eventual triumph. We started with the basics of unboxing and inspection, moved through the intricate dance of gyro and accelerometer calibration, and dove deep into the world of PID tuning and rates.
Remember the key takeaway from our earlier discussion: Rates define the feel, PIDs define the stability. Don’t get boged down in CLI commands unless you really need to. Focus on getting your mechanical setup right, calibrate your sensors on a level surface, and tune your rates to match your flying style.
Whether you are racing through a course or carving frestyle lines in the sky, a well-calibrated drone is your best friend. And if you ever find yourself stuck, remember: every crash is a lesson, and every calibration is a step closer to perfection.
So, what are you waiting for? Grab your tools, fire up Betaflight, and get that drone in the air!
🔗 Recommended Links
Ready to upgrade your gear? Here are some top picks from the Drone Brands™ team:
- DJI Goggles 2: Amazon | DJI Official
- GEPRC Mark5 Frame: Amazon | GEPRC Official
- Betaflight Configurator: GitHub
- ExpressLRS Radio Module: Amazon | ExpressLRS Official
- LiPo Safety Bag: Amazon
❓ FAQ

What tips can help optimize battery life during FPV drone flights?
To maximize battery life, avoid aggressive throttle spikes. Fly smoothly and use Expo to soften your stick inputs. Also, ensure your PID tuning is correct; a poorly tuned drone wastes energy fighting its own oscillations.
How often should I calibrate my FPV drone for consistent performance?
You should calibrate your gyro every time you change the battery or if the drone has been subjected to a hard crash. Accelerometer calibration is needed if you notice the drone struggling to level out in Angle mode.
Read more about “DJI Drone Mastery: 8 Must-Know Models & Secrets for 2026 🚁”
What are common mistakes to avoid when setting up an FPV drone?
Common mistakes include:
- Forgetting to remove props before arming.
- Installing props in the wrong direction.
- Calibrating on a non-level surface.
- Ignoring vibration issues and trying to fix them with software.
Read more about “Build vs. Buy FPV Drones: The Ultimate 2024 Guide 🚁”
How do I perform a compass calibration on my FPV drone?
If your drone has a compass, go to the Calibration tab in Betaflight. Click Calibrate Magnetometer and rotate the drone in all directions (like a 3D figure-8) until the progress bar is full. Keep the drone away from metal objects.
Read more about “🚀 10 Safe Drone Flying Spots for Beginners (2026)”
What is the best software for calibrating FPV drone sensors?
Betaflight Configurator is the industry standard for most FPV drones. For GPS-assisted drones, iNav is also excellent.
How can I improve the flight stability of my FPV drone?
Improve stability by:
- Ensuring your frame is rigid and vibration-free.
- Calibrating your gyro and accelerometer.
- Tuning your PID gains and filters.
- Using DShot protocol for cleaner motor signals.
Read more about “🚀 Top 50 Drone Businesses Dominating 2026: The Ultimate Guide”
What are the essential tools needed to set up an FPV drone?
You need a soldering iron, solder, screwdrivers, USB cable, multimeter, and a LiPo charger.
Read more about “FPV vs. Traditional Drones: The Ultimate Showdown (2026) 🚁”
What is the best PID tuning method for FPV drones?
Start with default PID values and adjust based on flight behavior. If the drone oscillates, lower the P gain. If it feels sluggish, increase the I gain. Use Blackbox logging to analyze your tuning.
How do I calibrate the accelerometer on my flight controller?
Place the drone on a level surface, go to the Calibration tab in Betaflight, and click Calibrate Accelerometer. Follow the on-screen prompts to tilt the drone to specific angles.
Read more about “🚀 Best FPV Drone for Beginners (2026): 8 Budget Bundles Revealed”
What is the ideal VTX power setting for long-range FPV?
For long-range, you may need 80mW or higher, but be aware of local regulations. Always start with the lowest power and increase only if necessary.
Read more about “Mastering Long Range Drone Transmission: Top 10 Systems in 2025 🚀”
How can I reduce video latency in my FPV goggles?
Use digital systems like DJI O3 or Walksnail Avatar for the best balance of quality and latency. For analog, ensure your frequency is clear of interference.
Read more about “FPV Drones Unleashed: 15 Must-Know Facts & Top Picks (2026) 🚁”
What is the correct way to set up Betaflight filters?
Enable Dynamic Notch Filter and RPM Filter (if using DShot). These filters remove noise without sacrificing responsiveness. Start with default settings and adjust if you notice oscillations.
How do I adjust the exponential rates for smoother FPV flying?
In the Rates tab, increase the Expo value to soften the response near the center of the stick. This makes small movements smoother and more precise.
What are the best props for maximizing FPV drone efficiency?
HQProp and Gemfan props are popular for their balance of efficiency and durability. The best prop depends on your motor KV and battery voltage.
📚 Reference Links
- Betaflight Documentation: Betaflight Wiki
- ExpressLRS Documentation: ExpressLRS Docs
- DJI Support: DJI Support Center
- Oscar Liang’s Naze32 Guide: Oscar Liang – Naze32 Setup
- Facebook Group Discussion: Calibrate flywing fw450l v3 before next flight? – Facebook (Note: This link may require login to view content).
- Walksnail Official: Walksnail Avatar